Der Beitrag How to End Another User’s SAP Session erschien zuerst auf ecosio.
]]>- Use transaction SM04 to list all active sessions including the one locking your document
- Double‑click the relevant user to view all the open transactions they have
- Select the session that is locking the document and click ‘Delete Session’ to end it
- This frees the document so you can continue editing it immediately
We’ve all been in that situation. You want to change a certain SAP document (e.g. a sales order in transaction VA02), but the system is giving you the following message: “Sales document 4711 is currently being processed (by user XYZ)”.

Often the user in question will simply have forgotten to close the transaction. This is an issue as SAP will keep the sales order document locked until they close it.
In order to resolve this issue, the logical next step is to try to get hold of the user (e.g. via email, Slack, Teams, etc.) and ask them to release the lock so that you can edit the sales document. Sometimes, however, the user locking the transaction may be away from their desk or already at home.
But you don’t have time to wait for them to return. You need to fix something in the sales order now – e.g. remove a delivery block. Luckily there is one more trick you can use – manually terminating the SAP session of another user.
Manually end another SAP user’s session
In order to kick another user out of their session, first open transaction SM04 and search for the user locking the document and the respective transaction. If you don’t have access to transaction SM04, reach out to somebody who does have access – e.g. a key user.

Double click on the session. This will open an overview of all the open transactions of the specific user.
 List of open transactions of a specific user
Select the transaction you would like to end and click Delete Session. The lock has gone and you can continue editing the document!
Want more SAP tips?
We’ve got lots of helpful “how to” articles on our blog. Simply visit our blog homepage and click on the “how to guides” tab to see them all.
SAP ERP® and SAP S/4HANA® are the trademarks or registered trademarks of SAP SE or its affiliates in Germany and in several other countries.
Der Beitrag How to End Another User’s SAP Session erschien zuerst auf ecosio.
]]>Der Beitrag Finding Translations for SAP® Terminology erschien zuerst auf ecosio.
]]>SAP® terminology
Anyone who deals with SAP® systems also quickly acquires the associated SAP® terminology – “transactions”, “sales organisations”, “company codes”, “SE80”, “VA01” and so on. For those working as consultants, specialist departments or SAP® Basis admins, these are all everyday terms.
While some terms consist purely of numbers and letters, such as transaction abbreviations like “SE80”, some SAP® terminology, such as “company code” or “sales organisation”, uses language/country-specific phrases and words. Unsurprisingly, this can result in difficulties when a project involves an international team. For example, when working with colleagues from Germany or France, the terms “company code” and “sales organisation” should not be used. In these cases the right country- and language-specific terms have to be used.
The following table shows the English terms for some development objects in ABAP alongside the corresponding German terms.
| English | Deutsch |
| Development Object | Entwicklungsobjekt |
| Application Hierarchy | Anwendungshierarchie |
| Package | Paket |
| Programme | Programm |
| Function Group | Funktionsgruppe |
| Function Module | Funktionsbaustein |
| Class / Interface | Klasse / Interface |
How did we arrive at these translations? We logged on to SAP® once in English, opened transaction SE80 and then repeated the whole thing in German. This works, but it is awkward. Moreover, it may be the case that the language you wish to get the translation for is not installed on your SAP® system.

SAP® transactions for translations
In order to find the correct translations for SAP® terminology quickly, SAP® provides its own transactions.
Terms in other languages can be found via the transaction STERM. The following illustration shows a section of the transaction and the search for the German term “Buchungskreis”.

© 2020. SAP SE or an SAP affiliate company. All rights reserved. Used with permission of SAP SE.
The results are listed according to the various SAP® components such as FI, MM, etc.

Search result in transaction STERM
© 2020. SAP SE or an SAP affiliate company. All rights reserved. Used with permission of SAP SE.
As an alternative to the STERM transaction, the SAPTERM transaction can also be used. The functionality is the same – the transaction just has more retro-chic.

Search result in transaction SAPTERM
© 2020. SAP SE or an SAP affiliate company. All rights reserved. Used with permission of SAP SE.
Want more SAP® tips and tricks?
Our blog offers a wide range of articles on everything from specific SAP® topics to broader areas such as e-invoicing and EDI optimisation.
Der Beitrag Finding Translations for SAP® Terminology erschien zuerst auf ecosio.
]]>Der Beitrag How to Save an IDoc Parser Report to a Local File erschien zuerst auf ecosio.
]]>How do I export an IDoc parser report?
Open transaction WE60 and enter the IDoc basic type – e.g. DELVRY01 and then hit the Parser icon or alternatively press F9.

© 2021. SAP SE or an SAP affiliate company. All rights reserved. Used with permission of SAP SE.
The SAP® system will generate the parser report.

© 2021. SAP SE or an SAP affiliate company. All rights reserved. Used with permission of SAP SE.
In order to export the parser report click More > System > List > Save > Local File. When being asked for the format in which you want to export, select Unconverted.
Have you already read our white paper on EDI in SAP®?
Discover the options available to SAP users when it comes to successful EDI integration in various systems with our helpful guide.
In search of other useful tips?
Our blog is filled with helpful “how to” articles, which can be found by clicking the “How to Guides” tab on our blog overview page.
Our resources section is also filled with useful assets, including white papers, webinars and infographics.
Alternatively, if you would like to speak to someone about your specific situation, please get in touch. We are always happy to help however we can!
Der Beitrag How to Save an IDoc Parser Report to a Local File erschien zuerst auf ecosio.
]]>Der Beitrag How to Debug SAP Message ME161 erschien zuerst auf ecosio.
]]>In the following blog post we will give a step by step walkthrough on how to debug this issue in SAP.
Quick solution
For the impatient, here is the quick solution to resolving ME161. The reason for this error is that there are inbound deliveries which have not been put away yet, but whose overall quantity exceeds the target quantity in the scheduling agreement in ME32L.
Say the target quantity of a given scheduling agreement 5500000147 in ME32L is for instance 40.000, like in the following example:

© 2021. SAP SE or an SAP affiliate company. All rights reserved. Used with permission of SAP SE.
In this case there shouldn’t be any inbound deliveries exceeding 40.000. One can easily check the inbound deliveries with transaction VL06I and open a specific inbound delivery with transaction VL33N. In the following example, relating to the scheduling agreement above, there is an erroneous inbound delivery with 4,000,000 parts, which is the root cause of the issue.

© 2021. SAP SE or an SAP affiliate company. All rights reserved. Used with permission of SAP SE.
Solution:
There are two ways to solve this…
- Remove the inbound delivery (if it is in fact an erroneous one)
- Increase the number of items in the scheduling agreement in transaction ME32L
The ME161 issue – a step-by-step debugging
For the less impatient, here is a more in-depth explanation. If you had encountered the given problem without having this blog post to hand – what would be the steps to get to this issue?
First of all, let’s check the message in detail. As soon as you try to add a new scheduling amount and a new scheduling date and you save the scheduling agreement, you will see the following warning in transaction ME38:

© 2021. SAP SE or an SAP affiliate company. All rights reserved. Used with permission of SAP SE.
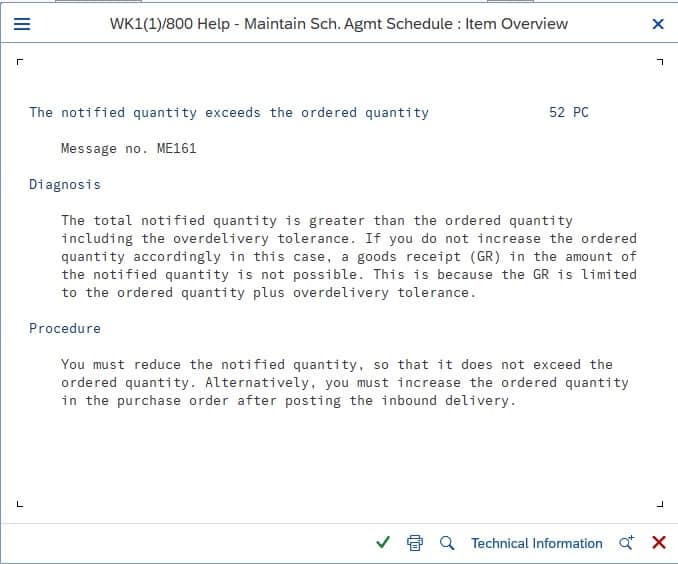
Click on View details and the following details will appear.
© 2021. SAP SE or an SAP affiliate company. All rights reserved. Used with permission of SAP SE.
If one looks a bit closer to the diagnosis part (and knowing the problem already, since we have disclosed the solution above), the issue is clear: the notified quantity is greater than the ordered quantity. But since you are working in the scheduling agreement and you just wanted to add a new line, you probably did not think about the notified quantity at all. Or you might not even know, what the system now means with notified quantity. At least I did not at at this point, that’s why a debugged it and wrote this post you are new reading.
So let’s dig deeper. Click on “Technical Information” to see, what kind of message has been raised there.

© 2021. SAP SE or an SAP affiliate company. All rights reserved. Used with permission of SAP SE.
Then click on navigate to reach the actual message. What we know so far already: it is the message number 161 (ME161) we need to chase.

© 2021. SAP SE or an SAP affiliate company. All rights reserved. Used with permission of SAP SE.
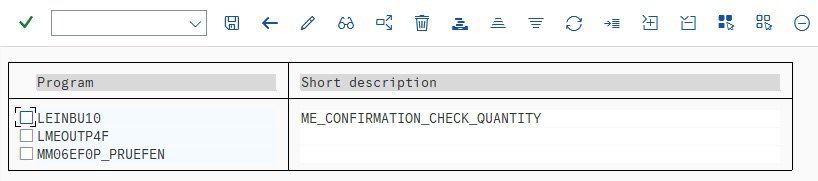
Click on the “Messages” tab and then select ME161. Then hit the “Where used list” button.

© 2021. SAP SE or an SAP affiliate company. All rights reserved. Used with permission of SAP SE.
In the dialog select the first three boxes and then execute the transaction. The following list is shown.
© 2021. SAP SE or an SAP affiliate company. All rights reserved. Used with permission of SAP SE.
Now the question is: which program is it? Well, here you either need some experience (so you know, which one to choose), or we need to check back with the transaction, where the problem initially occurred and the message was raised. In that case it was ME38. Go back to ME38, navigate to the scheduling items and enter /h in the transaction field and press Enter and then Enter again. That switches on the debugging mode.

© 2021. SAP SE or an SAP affiliate company. All rights reserved. Used with permission of SAP SE.
The second Enter opens the ABAP debugger, which discloses the program used behind the transaction.

© 2021. SAP SE or an SAP affiliate company. All rights reserved. Used with permission of SAP SE.
It is SAPMM06E. Thus, we know that MM06EF0P_PRUEFEN is presumably the right place to look further. Thus, in the previous where used list, double click on it, and the lines where the message is raised in ABAP will be displayed.

© 2021. SAP SE or an SAP affiliate company. All rights reserved. Used with permission of SAP SE.
Double click on the first line (618) and in the opening selection choose the program SAPMM06E. Set a breakpoint in line 618 and 620 and then execute transaction ME38 in debug mode again. The system will stop the execution at the given point.
If you now go backwards in the ABAP code, you can see that a return code 6 triggered the message. The return code 6 in turn was set in the loop above (line 567 onwards). The system checks all inbound deliveries related to the given scheduling agreement. If the confirmed quantity of all inbound deliveries is larger than the scheduled quantity, then the error message is raised.
That’s exactly what has been shown in the original error message (except that the term “notified quantity” is used there, instead of confirmed quantity).
To summarize: either you get the root cause of an error or a warning message straight away and know what to do, or you start looking under the bonnet by debugging the ABAP code. With some know how the latter is easier than it sounds!
Want more information?
If you still have questions about ME161 or how best to handle EDI in your SAP system feel free to contact us; we are more than happy to help!
Alternatively, you can find lots of relevant SAP content in our resource centre.
Der Beitrag How to Debug SAP Message ME161 erschien zuerst auf ecosio.
]]>Der Beitrag How to Plan an EDI Project Correctly erschien zuerst auf ecosio.
]]>- Ignorance of the different options available and haste to implement a solution are common reasons why businesses choose ill‑suited EDI systems, leading to higher operational effort later
- Take ownership of the planning stage internally and ensure it includes an EDI expert (internal or external) to retain visibility and control over decisions
- Ensure your business has sufficient resources to run and maintain whichever EDI solution you select
Given the importance of EDI in modern supply chains and the expensive consequences of implementing a poorly-suited solution, it has never been more important to plan EDI projects carefully. Unfortunately, planning remains an area that businesses often overlook when it comes to EDI. Thankfully, as you are reading this, this is unlikely to be true for you!
To help ensure you don’t experience the same issues as others, in this article we’ll briefly outline some of the most common mistakes made by businesses when preparing for an EDI implementation/migration project and what you can do instead during this stage to increase the chances of a successful outcome.
Where people go wrong
So why do so many businesses end up with an EDI solution that doesn’t fit their unique requirements well?
While there are many potential answers to this question, the most common reasons for this failure include ignorance of the different options available and haste to implement a solution. As a result, whilst they may gain the ability to trade automated messages with partners, businesses with little in-house EDI expertise, for example, often find themselves having to put in a lot more time and effort to the operation and maintenance of their new systems post-implementation than expected.
Similarly, by not considering future needs when selecting an EDI system, companies typically find themselves trapped in ill-suited solutions, with providers charging substantial amounts to implement the necessary upgrades.
For example, a supplier may initially intend to conduct all customer onboardings in-house and select a solution accordingly. However, after their trading partner network begins to grow and internal teams recognise how time-consuming managing partner onboarding internally can be, they may want their provider to handle future customer onboardings to prevent inhibiting future growth. More often than not this will not come cheap – especially if you are already tied into a long contract!

What you can do to improve the success of your EDI project
To achieve the best outcome for your EDI project, it is important to take ownership of the planning stage internally and not outsource this to a provider or consultant. You know your business better than anyone else, and by outsourcing the planning stage you sacrifice visibility and control of the process and subsequent decision.
It is imperative, however, that the planning stage includes an EDI expert, whether this is an internal or external person/team. For a business without in-house EDI expertise, for example, an ideal planning setup would be an internal decision-making team which understands the current and future needs of the business, supported by an experienced EDI vendor that can suggest improvements and cost-saving optimisations.
In terms of specific considerations during this stage, arguably the most important is to ensure your business has sufficient resources to run and maintain whichever EDI solution you select. A helpful breakdown of the amount of help provided by different types of EDI provider (and thus how much internal work will be required) can be found in our detailed infographic on this subject.
Want more information?
This article constitutes one of the seven mistakes we cover in our white paper The 7 Most Expensive Mistakes EDI Solution Buyers Make… And How to Avoid Them.
Download your copy of “7 Key EDI Mistakes to Avoid” and find out how you can boost the success of your EDI project and optimise existing processes, simply fill in your details.
Alternatively, if you have any questions about your particular situation or anything else EDI related, feel free to get in touch! We are always happy to help!
Der Beitrag How to Plan an EDI Project Correctly erschien zuerst auf ecosio.
]]>Der Beitrag How to Plan an EDI Project Correctly erschien zuerst auf ecosio.
]]>To help ensure you don’t experience the same issues as others, in this article we’ll briefly outline some of the most common mistakes made by businesses when preparing for an EDI implementation/migration project and what you can do instead during this stage to increase the chances of a successful outcome.
Where people go wrong
So why do so many businesses end up with an EDI solution that doesn’t fit their unique requirements well?
While there are many potential answers to this question, the most common reasons for this failure include ignorance of the different options available and haste to implement a solution. As a result, whilst they may gain the ability to trade automated messages with partners, businesses with little in-house EDI expertise, for example, often find themselves having to put in a lot more time and effort to the operation and maintenance of their new systems post-implementation than expected.
Similarly, by not considering future needs when selecting an EDI system, companies typically find themselves trapped in ill-suited solutions, with providers charging substantial amounts to implement the necessary upgrades.
For example, a supplier may initially intend to conduct all customer onboardings in-house and select a solution accordingly. However, after their trading partner network begins to grow and internal teams recognise how time-consuming managing partner onboarding internally can be, they may want their provider to handle future customer onboardings to prevent inhibiting future growth. More often than not this will not come cheap – especially if you are already tied into a long contract!
What you can do to improve the success of your EDI project
To achieve the best outcome for your EDI project, it is important to take ownership of the planning stage internally and not outsource this to a provider or consultant. You know your business better than anyone else, and by outsourcing the planning stage you sacrifice visibility and control of the process and subsequent decision.
It is imperative, however, that the planning stage includes an EDI expert, whether this is an internal or external person/team. For a business without in-house EDI expertise, for example, an ideal planning setup would be an internal decision-making team which understands the current and future needs of the business, supported by an experienced EDI vendor that can suggest improvements and cost-saving optimisations.
In terms of specific considerations during this stage, arguably the most important is to ensure your business has sufficient resources to run and maintain whichever EDI solution you select. A helpful breakdown of the amount of help provided by different types of EDI provider (and thus how much internal work will be required) can be found in our detailed infographic on this subject.
Want more information?
This article constitutes one of the seven mistakes we cover in our white paper The 7 Most Expensive Mistakes EDI Solution Buyers Make… And How to Avoid Them.
Download your copy of “7 Key EDI Mistakes to Avoid” and find out how you can boost the success of your EDI project and optimise existing processes, simply fill in your details.
Alternatively, if you have any questions about your particular situation or anything else EDI related, feel free to get in touch! We are always happy to help!
Der Beitrag How to Plan an EDI Project Correctly erschien zuerst auf ecosio.
]]>Der Beitrag How to create an SAP transaction code erschien zuerst auf ecosio.
]]>- Begin by using transaction SE93 to enter your desired transaction code, for example, ZABAPGIT
- Provide a meaningful short description that will appear in the SAP menu favourites, helping users identify the purpose of the transaction code
- Define the start object as a program with selection screen (report transaction) and specify the associated ABAP programme and screen number, choosing the GUI capabilities to suit your environment
- Save the new transaction code with either the Local Object option or assign it to a package, making it immediately available to the user
SAP transaction codes are easy-to-remember identifiers consisting of letters and numbers that can be used to start a specific SAP transaction. For example, the SAP transaction for processing a vendor can be called up easily using transaction code XK03, and the transaction for processing a customer using transaction code XD03, etc. Sometimes it may also be necessary to assign a separate transaction code for a specific ABAP report, so that it can be easily integrated into the SAP start menu under Favorites, for example.

© 2020. SAP SE or an SAP affiliate company. All rights reserved. Used with permission of SAP SE.
Suppose we want to create a new SAP transaction code for abapGit. abapGit is an ABAP client for Git, which allows you to manage ABAP code in Git – e.g. using GitHub, Bitbucket etc.
To start abapGit, you usually navigate to transaction SE38 and execute the program ZABAPGIT_STANDALONE. To make this easier, we want to start abapGit using the transaction code ZABAPGIT. However, we must first create this. How this works, we will look at below.
Create new SAP transaction code
To create a new transaction code, we start transaction SE93 and enter the desired transaction code in the selection window – in our case ZABAPGIT.

© 2020. SAP SE or an SAP affiliate company. All rights reserved. Used with permission of SAP SE.
Then we choose a short name for the transaction code (this will later be displayed as text in the SAP menu favourites – so ideally choose a meaningful name) and specify the type of the start object. In the case of abapGit we want to start a program with a selection screen (report transaction).

SE93 – Short name and type of start object
© 2020. SAP SE or an SAP affiliate company. All rights reserved. Used with permission of SAP SE.
In the next dialogue we select the programme to be started within the transaction code. In the case of abapGit the ZABAPGIT_STANDALONE.

© 2020. SAP SE or an SAP affiliate company. All rights reserved. Used with permission of SAP SE.
Then we still need the screen number. With the GUI capability, you can still specify under which GUI the transaction can run. Then press save. This opens a dialog for creating an object directory entry.

SE93 – Create object catalogue entry
© 2020. SAP SE or an SAP affiliate company. All rights reserved. Used with permission of SAP SE.
If the transaction code is to be used only by the current user, Local Object can be selected. Then just press Save and it is available immediately.
Have any questions?
Do you still have questions about SAP transaction codes or EDI in SAP more generally? Feel free to contact us, we would love to help you!
SAP ERP and SAP S/4HANA are the trademarks or registered trademarks of SAP SE or its affiliates in Germany and in several other countries.
Der Beitrag How to create an SAP transaction code erschien zuerst auf ecosio.
]]>Der Beitrag How to Set Up and Manage Automatic SAP Jobs erschien zuerst auf ecosio.
]]>- SAP jobs run processes automatically at scheduled times to avoid manual execution, such as running tasks during off‑peak hours or retrieving EDI messages
- You create jobs in transaction SM36, choosing a unique job name, assigning a job class for priority (A high, B medium, C low), and defining start conditions and processing steps
- Jobs consist of one or more steps, typically running ABAP programs with specific variants
- Job status transitions from planned to released, ready, active, and finished, and any cancellations or issues are visible in job logs and spool
What is an SAP job for and how is it structured?
Background jobs are used in many areas where processes are executed automatically by the system at certain times without manual intervention. In the area of Unix systems, the concept of cron jobs is well known, and on Windows computers,background processes can be set up with the task scheduler. SAP also has appropriate background processing for processes – so-called SAP jobs.
SAP jobs can be executed once or recurrently – for example, every day at midnight. This allows, for example, resource-intensive processing to take place at night when few or no users are logged on to the system. Another application example is the recurring collection of new EDI messages from an external B2B Integration Hub, as in the case of ecosio.
In the following article we will introduce the most important features and show how to set them up. We then go into how to modify existing SAP jobs and how to read processing logs from SAP jobs.
Properties of SAP jobs
SAP jobs are set up using transaction SM36. The following graphic shows an example SAP job.

© 2020. SAP SE or an SAP affiliate company. All rights reserved. Used with permission of SAP SE.
There are unique job names that can be freely assigned. For reasons of clarity, it is recommended that you adhere to a uniform system-wide naming convention.
SAP job classes
An SAP job must be assigned to a specific job class when it is created. Job classes define the priority with which a background job is executed. A distinction is made between the following three classes.
Class A – High priority
Urgent or critical background jobs can be planned with class A. These jobs are given priority before class B or C jobs are executed.
Class B – Medium priority
As soon as class A jobs are processed, class B jobs are started.
Class C – Low priority
Class C jobs have the lowest priority and are only started when class A and B jobs have been processed.
Status
Besides the assigned priority class, there is a certain status. The possible statuses are as follows:
- Planned
The job is only scheduled, but has no start condition, end date, execution frequency, and so on, and will never run. - Released
The job has assigned process steps and all the parameters for execution are available. The job is waiting to be executed for the first time as soon as the start condition is fulfilled – e.g. a certain time. - Ready
The job is ready for execution and has been placed in the execution queue by the job scheduler. As soon as a background process is free, the job is executed. - Active
The job runs in the background. The status of the job can no longer be changed during execution. - Ready
The job has been successfully completed. - Cancelled
The job has been canceled. The termination may have been caused manually by an administrator, or a problem may have occurred during the execution of the job. The exact details can be read in the job logs and in the spool (see description below).
Steps
Every SAP job consists of one or more processing steps – so-called steps. The following figure shows an example step.

© 2020. SAP SE or an SAP affiliate company. All rights reserved. Used with permission of SAP SE.
A step in an SAP job can have three different characteristics:
- ABAP program
In this case, an ABAP program is started and a variant and the language can be passed. In the screenshot above, for example, the ABAP program /EPO1/EXC_ECOSIO_FETCH is executed with the variant FETCH, which periodically fetches messages from the ecosio cloud-based EDI solution (our Integration Hub). - External command
With this function, a command predefined by the system administrator can be called up and parameters can also be transferred for the call. - External program
In this case an external program is started, whereby parameters can also be transferred here.
Setup
In the first step, the job name and job class are defined in transaction SM36, as mentioned above. Then the individual steps of the job are defined, which are executed in sequence – from top to bottom.
The next step is to select the start condition of the job.

© 2020. SAP SE or an SAP affiliate company. All rights reserved. Used with permission of SAP SE.
Usually you choose a certain time as start condition, from when the job should be executed, and a repeat interval – e.g. every 10 minutes. If no time is specified, the job remains in the “scheduled” state and is not executed.
After specifying a time and a repetition frequency, the job is saved. Afterwards the job changes to “released” and waits for its first execution. Alternatively, a job can be executed immediately by clicking on “Immediately”.
Change
To change an SAP job, go to transaction SM37. There you can get an overview of all jobs in the different statuses. To change a job that has already been released, select it in the overview and then choose “Job > Released – Scheduled” from the menu bar.

© 2020. SAP SE or an SAP affiliate company. All rights reserved. Used with permission of SAP SE.
The job can now be processed again and then released again.
View logs
As with a regularly executed process, an SAP job can also terminate unexpectedly. In this case, we recommend that you look at the logs. You can access this again using transaction SM37. In the first step, select one of the jobs already executed and then choose “Spool” or “Job log”.

© 2020. SAP SE or an SAP affiliate company. All rights reserved. Used with permission of SAP SE.
These two functions provide an overview of the logs themselves and the individual process steps. A prerequisite is, of course, that the process steps also write processing logs.
With the introduction of SAP S/4HANA, the IDoc format will undergo some changes. You can find out what these changes are in detail in this article.
Do you have any questions?
Do you still have questions about SAP jobs or the connection of external systems to your SAP ERP or SAP S/4HANA system? Do not hesitate and contact us. We are always available to answer your questions.
SAP ERP and SAP S/4HANA are the trademarks or registered trademarks of SAP SE or its affiliates in Germany and in several other countries.
Der Beitrag How to Set Up and Manage Automatic SAP Jobs erschien zuerst auf ecosio.
]]>Der Beitrag IDoc Status Change in SAP ERP erschien zuerst auf ecosio.
]]>- Errors during inbound or outbound IDoc processing can cause an IDoc to “hang” in an error status, often due to incomplete data from business partners or misconfiguration
- An IDoc stuck in status 20 (“Error triggering EDI subsystem”) must first be reset to status 30 (“IDoc is ready to send via ALE”) before it can be processed agai
- To change the status of one or multiple IDocs, run transaction SE38 and execute the programme RC1_IDOC_SET_STATUS then restart processing using transaction WLF_IDOC
- The article includes a full list of standard SAP IDoc status codes, covering both outbound (00–49) and inbound (50–75) scenarios for reference and troubleshooting
The status of an IDoc
IDoc documents are used to exchange business documents such as purchase orders, invoices, delivery notes, etc. with an SAP system. Upstream of the SAP system, an EDI service provider typically converts the IDocs to and from the various formats of the individual business partners (for example, EDIFACT or ANSI ASC X12).
Errors can occur during processing of both inbound and outbound IDocs in the SAP system. For example, incomplete IDocs may arrive in the SAP system because a business partner has not sent all the information requested. In this case, the IDoc “hangs” in an error status.
The following figure shows an extract from SAP transaction BD87.

BD87 transaction with IDoc overview
© 2020. SAP SE or an SAP affiliate company. All rights reserved. Used with permission of SAP SE.
For example, an outgoing IDoc has stuck in status 20. This status means ‘Error when triggering the EDI subsystem’. One reason for this error could be incorrectly configured settings in the system. The IDoc detail view provides more information. As soon as the error has been corrected, processing of the IDoc must be restarted. However, status 20 does not allow direct processing, so the status must first be set to 30. 30 stands for ‘IDoc is ready to send (ALE service)’.
A list of all the possible statuses of an IDoc can be found at the end of this article.
Change Status
To change the status of an IDoc, proceed as follows.
Call transaction SE38 and execute the program RC1_IDOC_SET_STATUS.

Program call in transaction SE38
© 2020. SAP SE or an SAP affiliate company. All rights reserved. Used with permission of SAP SE.
The following report will then open. If you want to change the status of several IDocs at once, you can use the button next to the text field ‘IDOC number’ and specify several IDoc numbers.

© 2020. SAP SE or an SAP affiliate company. All rights reserved. Used with permission of SAP SE.
You can then trigger the processing of the IDoc again — for example, in transaction WLF_IDOC.
Our blog is filled with helpful “how to” articles, which can be found by clicking the “How to Guides” tab on our blog overview page.
Any more questions?
Do you still have questions about IDocs or electronic data exchange with an SAP ERP system? Do not hesitate and contact us or use our chat. We’re always happy to help!
IDoc statuses
The following table provides an overview of the standard IDoc statuses in an SAP system.
| STATUS | Description |
|---|---|
| Outgoing IDocs (from SAP view) | |
| 00 | Not used, only R/2 |
| 01 | IDoc created |
| 02 | Error passing data to port |
| 03 | Data passed to port OK |
| 04 | Error within control information of EDI subsystem |
| 05 | Error During Translation |
| 06 | Translation OK |
| 07 | Error during syntax check |
| 08 | Syntax check OK |
| 09 | Error during interchange handling |
| 10 | Interchange handling OK |
| 11 | Error during dispatch |
| 12 | Dispatch OK |
| 13 | Repeat transmission (Retransmission) OK |
| 14 | Interchange acknowledgement positive |
| 15 | Interchange acknowledgement negative |
| 16 | Functional acknowledgement positive |
| 17 | Functional acknowledgement negative |
| 18 | Triggering EDI subsystem OK |
| 19 | Data passed to port for test |
| 20 | Error triggering EDI subsystem |
| 21 | Error passing data for test |
| 22 | Dispatch OK, acknowledgement still due |
| 23 | Error during retransmission |
| 24 | Control information of the EDI subsystem OK |
| 25 | Processing despite syntax error (outbound) |
| 26 | Error during syntax check of IDoc (outbound) |
| 27 | Error in dispatch level (ALE service) |
| 28 | IDoc sent to ALE distribution unit retroactively |
| 29 | Error in ALE service |
| 30 | IDoc ready for dispatch (ALE service) |
| 31 | Error, no further processing |
| 32 | IDoc was edited |
| 33 | Original of an IDoc that was edited |
| 34 | Error in the control record of IDoc |
| 35 | IDoc reloaded from archive |
| 36 | Electronic signature not performed (timeout) |
| 37 | Error when adding IDoc |
| 38 | IDoc archived |
| 39 | IDoc is in target system (ALE service) |
| 40 | Application document not created in target system |
| 41 | Application document created in target system |
| 42 | IDoc created by test transaction |
| Incoming IDocs (from SAP view) | |
| 50 | IDoc added |
| 51 | Application document not posted |
| 52 | Application document not fully posted |
| 53 | Application document posted |
| 54 | Error during formal application check |
| 55 | Formal application check OK |
| 56 | IDoc with errors added |
| 57 | Test IDoc: Error during application check |
| 58 | IDoc copy from R/2 connection |
| 59 | Not used |
| 60 | Syntax error in IDoc (inbound) |
| 61 | Processing despite syntax error (inbound) |
| 62 | IDoc passed to application |
| 63 | Error passing IDoc transfer to application |
| 64 | IDoc ready to be passed to application |
| 65 | Error in ALE service |
| 66 | IDoc waits for predecessor IDoc (serialization) |
| 67 | Not used |
| 68 | Error, no further processing |
| 69 | IDoc was edited |
| 70 | Original of an IDoc that was edited |
| 71 | IDoc reloaded from archive |
| 72 | Not used, only R/2 |
| 73 | IDoc archived |
| 74 | IDoc created from test transaction |
| 75 | IDoc is in inbound queue |
SAP ERP and SAP S/4HANA are the trademarks or registered trademarks of SAP SE or its affiliates in Germany and in several other countries.
Der Beitrag IDoc Status Change in SAP ERP erschien zuerst auf ecosio.
]]>Der Beitrag How to add an entry to an SAP table erschien zuerst auf ecosio.
]]>- Use SE16 or SE16n if a maintenance dialog exists; you can check this in SE11 under “Delivery and Maintenance”
- If the dialog is not available, try SE37 with the function module SE16N_INTERFACE and activate edit mode using parameters
- Advanced users can edit directly in SE16 or SE16n using debug mode to manually insert entries
- These techniques are intended for test environments only and should never be used in production
In principle, there are several ways to add an entry to an SAP table. One is in the form of standardized transactions (for example, VOE4 for editing the EDPAR table) or using maintenance transactions such as SM30. However, both options are not always available. Either there is no separate transaction for maintaining a table or no maintenance dialog has been created for a particular table. This often occurs with Z tables.
Sometimes it can be useful to add a few entries to a table quickly for test purposes, so that a particular functionality can be tested. One possibility is presented below. This type of data change should only be performed on test systems and not on production environments. In most cases, however, this is prevented anyway by the lack of access to the corresponding transactions in production environments.
For more information on ecosio EDI as a Service solution and to find out how we could help your business move to the next step, get in touch today or chat with our Sales team now!

Add entry to an existing SAP table
Option A): Using the standard transaction SE16 or SE16n
This option is the “cleanest” approach, but is only available if a maintenance dialog is created for the table and table processing is allowed. To check whether there is a maintenance dialog, call transaction SE11, enter the table name and press F8. Click on “Delivery and Maintenance” to display the editing option.

© 2020. SAP SE or an SAP affiliate company. All rights reserved. Used with permission of SAP SE.
If “Display/Maintenance Allowed with Restrictions” or “Display/Maintenance Not Allowed” is activated, only options B), C) or D) come into consideration – see below.
If “Display/Maintenance Allowed” is activated, however, entries can be created using transaction SE16 or SE16n. To change existing entries, you can use transaction SM30, for example.

© 2020. SAP SE or an SAP affiliate company. All rights reserved. Used with permission of SAP SE.
The newer transaction SE16n provides its own maintenance dialog, which can be called via “View Maintenance”. You can use this to change existing entries and create new entries.
Transaction SE16n
© 2020. SAP SE or an SAP affiliate company. All rights reserved. Used with permission of SAP SE.
Option B) Via transaction SE37
If it is not possible to add entries by default using transaction SE16, the following approach can also be chosen.
First, open transaction SE37 and choose the function module SE16N_INTERFACE. Then start the dialog with F8 or by clicking on “Test/Execute”.
If it is not possible to access transaction SE37, continue with option C or D (see below).

The following dialog will then open.

© 2020. SAP SE or an SAP affiliate company. All rights reserved. Used with permission of SAP SE.
In the first line, instead of <THE_TABLE_NAME>, enter the name of the table for which new entries are to be added. Enter an X for each of the parameters I_EDIT and I_SAPEDIT. Then execute with F8.
This opens the selected table and new entries can be added with the function “New entry”. Furthermore, existing entries can also be changed very easily.

© 2020. SAP SE or an SAP affiliate company. All rights reserved. Used with permission of SAP SE.
The tabular display allows easy editing, as seen in programs like Excel, for example.
Option C): Using transaction SE16 with debug mode
In the first step, start transaction SE16 and select the desired SAP table. Then press F8 to execute the transaction so that the individual table entries are displayed.

© 2020. SAP SE or an SAP affiliate company. All rights reserved. Used with permission of SAP SE.
Double-click on one of the existing SAP table entries to open the detailed view of an entry.

Transaction SE16: Detail view of an entry
© 2020. SAP SE or an SAP affiliate company. All rights reserved. Used with permission of SAP SE.
Then enter “/h” in the command field to start the debug mode. Click once more in the command field and press Enter to start a debug session.

© 2020. SAP SE or an SAP affiliate company. All rights reserved. Used with permission of SAP SE.
The ABAP code under the transaction then opens. Double-click on the variable “code” in the ABAP code (left arrow). Then change the value of the variable in the right-hand window to “EDIT” (for editing) or “INSR” (for inserting) and confirm with Enter.

Debug mode to change a variable
© 2020. SAP SE or an SAP affiliate company. All rights reserved. Used with permission of SAP SE.
Then press F8 to finish the code. The entry can now be edited or a new entry can be added.
Option D): Using transaction SE16N with debug mode
Start transaction SE16n, enter SAP table name and press F8.

© 2020. SAP SE or an SAP affiliate company. All rights reserved. Used with permission of SAP SE.
Start the debug mode in the detail view by entering /h in the command field. Then press Enter again in the command field to start a new debug session. In the debug session, add the following two variables, set the value to “X” and finish the execution with F8.
- GD-SAPEDIT
- GD-EDIT

© 2020. SAP SE or an SAP affiliate company. All rights reserved. Used with permission of SAP SE.
The entries can now be edited or a new entry can be added.

© 2020. SAP SE or an SAP affiliate company. All rights reserved. Used with permission of SAP SE.
Any questions?
We’ve got lots of helpful “how to” articles on our blog. Simply visit our blog homepage and click on the “how to guides” tab to see them all.
For more information on ecosio EDI as a Service solution and to find out how we could help your business move to the next step, get in touch today or chat with our Sales team now!
SAP ERP and SAP S/4HANA are the trademarks or registered trademarks of SAP SE or its affiliates in Germany and in several other countries.
Der Beitrag How to add an entry to an SAP table erschien zuerst auf ecosio.
]]>